2019 Communications, Technical Writing, Content Creation, and Artificial Intelligence Conferences

One of my favorite tasks at the beginning of each year is to plan for conferences. With respect to Communication and Technical Writing there is so much to learn in 2019 and beyond. Conferences provide a way to sharpen your skills while away from regular work, meet experts face-to-face, network, and break out of your comfort zone. Many conferences offer scholarships and reduced rates for students.

Below is a list of communications and technical writing conferences in the coming months; some are in Pittsburgh, some in the USA, others are in foreign countries.

March

13th-16th, Conference on College Composition & Communication, Performance-Rhetoric, Performance-Composition, David L. Lawrence Convention Center, Pittsburgh, PA

27th – 30th, Association of Writers & Writing Programs, AWP Conference, Portland, OR


April

9th – 10th, The Carnegie Mellon University – K&L Gates Conference on Ethics and AI, Pittsburgh PA, USA

10th-14th, Eastern Communication Association Annual Conference: Creating Our Future, Providence, RI

14th – 17th, MadCap Software User Group: Madworld, San Diego, CA

26th – 27th, Artificial Intelligence: Thinking about Law, Law Practice, and Legal Education, Pittsburgh PA, USA

29th – May 2nd, Innovation Research Interchange 2019 Annual Conference – Innovation Unleashed: Physical Meets Digital, Pittsburgh PA, USA

30th – May 2nd, Social Media Week, New York, NY


May

5th-6th, The American Society of Journalists and Authors Conference (ASJA), Collaboration Nation, New York, NY

5th – 8th, Society for Technical Communication, Technical Communication Summit & Expo, Denver, CO

19th – 21st, Write the Docs, Portland, OR


June

5th-8th, NASIG 34th Annual Conference,  Building Bridges: Connecting the Information Community, Pittsburgh, PA

9th – 12th, IABC World Conference, Vancouver, CA

12th – 14th, 4th Biennial Philosophy of Communication Conference, Duquesne University Power Center, Pittsburgh PA

22nd – 26th, Robotics: Science and Systems, Pittsburgh, USA


July

14st – 16th, SEAT Conference, Daytona, FL


September

3rd – 6th, Content Marketing World Conference and Expo, Cleveland, OH

29th – Oct 1st, Association for Women in Communications, National Professional Development Conference, Embassy Suites, Saint Charles, MO


October

8th – 11th, MadCap Software: MadWorld Europe, Dublin Ireland

How Old is That Resume?

No one really knows when or where resumes originated. As far as recorded history is concerned, Leonardo Da Vinci is credited with being the first to use a resume. In 1482 Leonardo wrote a letter to the Duke of Milan requesting a patronage. The letter contained a list of his skills and accomplishments. After that there is a gap in the historical record for resumes. Somewhere from 1930 to 1950 resumes migrated from writings on scraps of paper to being typewritten. At this point the resume, derived from the French word for summary, became the standard for differentiating an applicant’s skills and for getting a job.

Resumes are our advertisement of who we are and what is unique to us. Do I have my dates correct? Did I learn a new skill? Am I going to Stand out? These are all questions resume writers ask themselves at one time or another. Lets take a look at some different styles that can be used for layout.

Resume Styles

  • Reverse Chronological – This style of resume lists job experience in chronological order. The most recent experience is listed first and then moves chronologically back through time. This style does highlight gaps in employment.
  • Functional – Using this style work experience and skills are categorized by skill area or job function. These skills are followed by a timeline of those experiences including employers and specific dates. Functional resumes work well for candidates who have changed careers.
  • Hybrid – This combined style leads with a list of job skills then a list of employers. This style can result in repetition and is not frequently used.

While there may be instances where an infographic or video resume may be necessary or requested, electronic resumes are the norm. Increasingly more employers are requiring online resumes. When submitting your resume be sure to submit the required format, Word document, HTML, PDF, or ASCII. Electronically submitted resumes can be parsed using natural language processors and imported to the hiring company’s resume system. Some parsers are better than others at correctly identifying titles, dates, and task specific text. Resumes containing columns may not be parsed as accurately as one containing tab spacing.

It is always best to stay up-to-date with technology. Including the technology used by those who need to find you in order to hire you.

A New Year and a Unique Process for Defining a Content Strategy

Ah, the start of a new year. It brings so many possibilities because it is the best time for a fresh start. With a fresh start you want to have a different perspective and a  different set of goals for the year. I am someone who likes to make lists and live by the list. I am a planner. Planning gives me a clear sense of where I am going and allows me to break my supporting activities into smaller reachable goals.

For this blog post, I want to discuss planning for content. Content could mean a marketing plan, a twitter campaign, documentation for a product release, or in my case, planning effective content for the readership of this blog. I will define the process in a manner that it could be applied to any campaign you may be working on related to communication or technical writing.

While researching the components of a successful content campaign, I found a link to a list of 2018-2019 monthly messaging themes for the University of Washington Marketing and Communications department. These themes are defined at the university level and are used by all marketing and communications at the university.

“As part of our efforts to maximize the effectiveness of our marketing and communications projects across the University of Washington, we will be utilizing monthly message themes again during the 2018-19 academic year.”

The page contains a grid of month, theme, and strategic communications. Each month, July through June is a row in the grid. Each month a different them is selected. The theme is accompanied with an accompanying hashtag for use on social media channels.

The lesson I learned from this link is that when designing a campaign, be sure to determine whether your business or organization has a defined strategy. If there is a strategy, following it for your campaign will ensure you are in line with organization goals and will save you the time of defining the whole plan yourself. You will only have to alight your specific campaign plan to the organization plan.

I cannot find a predefined messaging theme for Chatham University. At publication, I am waiting for a response from the Office of University Communications. Below is the grid I started for this blog. I have only added the months for this spring semester.

Month Theme
January Unique and Wonderful
February Think Innovation
March Keep Reaching
April Looking to the Future


Each week, I post a new article. The articles I post for January will all have a title and information related to some unique and wonderful aspect of communication and/or technical writing. Breaking this down into a monthly message is helping me find direction in what information I would like to include.

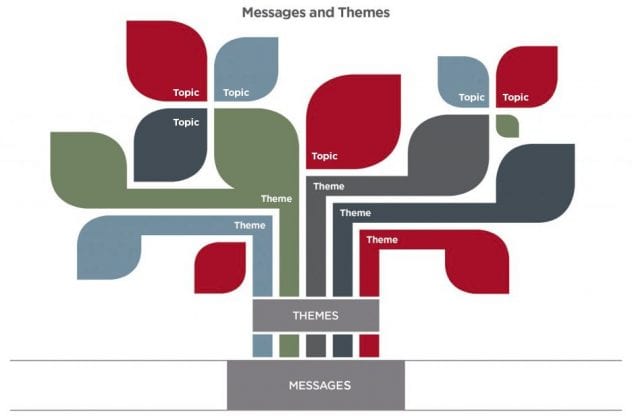
Another Internet search lead me to Follow These 3 Steps for Content Framework to Save Your Marketing Plan. This article describes growing a content tree. The roots are your messages, the branches are themes and the leaves are individual topics.

Resource: Yvonne Lyons

Using the graphic, I am able to drill-down and further define the content for the blog. The messages for this blog are defined by the departments it supports; Communications and Technical Writing. All messages contain some element of best practices, disciplines of communication and technical writing, and promotion of these programs at Chatham University.

Now that I have the plan complete I believe:

  1. I can come up with topics more easily.
  2. The topics I choose will be more interesting for readers.

This blog post fits right in with the January theme.

Unique and Wonderful – A New Year and a New Process for Defining a Content Strategy

Relaxation: Always a Best Practice

2018. Here we are at the end. The end of the year can be a frantic race to meet work deadlines, finish classes, and prepare for year end festivities. It is also an important time to focus on yourself. You need to look back on the year and be proud of the work you have completed, take time to plan for the year ahead, and then relax. For writers and communicators, finding time to relax may be difficult.

There may be days during each year that you feel that the work you do does not matter. Your reflection time will help you to realize the good in your work. No mater the type of work or schooling you participate in, the work you do impacts the lives of others. Maybe you are achieving your dream; maybe you are opening the door for someone else and their dream. You have the ability to change the direction of your company and positively impact its success. One person, in the right position, at the right time has the power to do that. Remember, you are your own brand. You are the face and voice of the brand. You owe it to yourself to be at your best.

Here are some methods of relaxation along with their benefits that you can try to incorporate into you end of year routine:

  • Deep breathing: reduces cortisol, the stress hormone. This calms your nervous system which results in reduced anxiety and stress.
  • Meditation: this can reduce stress and anxiety. In addition, some forms of mediation can result in improved self-image and a more positive outlook on life.
  • Soak in a hot tub: lowers blood pressure and aids in sleep
  • Exercise: boosts levels of serotonin and strengthens muscles and bones
  • Take a break: re-energizes your brain
  • Laugh: releases endorphins and relaxes the whole body. After a good laugh your muscles can remain relaxed for up to 45 minutes. Laughter also boosts the immune system.

Planning for the upcoming year can and should be exciting. The possibilities are truly endless. What vision do you have for your life? That is a question you should answer and write down if you have not already. With your vision in mind, set some goals. Goals should be attainable in both scope and number. I tend to favor goals in threes; three goals for the year. I follow this daily as well in my 3 things to accomplish today list. If your work or school does not conduct performance reviews or some kind of check in, be sure to set a calendar reminder to check in yourself a few times per year. That way you can be sure you are on track or adjust your track for changes that are happening around you.

Relax now and energize yourself for all that 2019 has for you. As a gymnast I had a common phrase with my team mates, “Never leave the mat on a bad one”. If you leave the mat on a bad one, you feel bad and the feeling can carry over to the next time you face the mat. My wish for you in these closing weeks of 2018 are to dig deep, finish 2018 strong, leave the mat, and come back stronger.

Extracting Images from Word Documents

It can be time consuming to manually resize and save images that appear in Word® as an image file. This involves clicking on each image then saving to a specific location. For a document with fifty images, you would have to repeat this fifty times. Sometimes it is also necessary to have the actual image rather than to copy the image from one Word file to another; perhaps a call-out needs added to the image or the image is bound by a style in Word. There are a few ways to extract images from Word documents to a Windows Explorer folder; Converting the document to a .ZIP file, saving the document as a web page, or importing the document to a Help Authoring Tool such as Flare. Once extracted, the files can be opened in a graphics application such as Photoshop or Capture.

If you have another way to extract images from Word documents, please comment and share your knowledge.

Converting Document to .ZIP File:

Note: If an image is inserted in Word and is then cropped, when the .Zip trick is performed the extracted image file will contain the uncropped image at 100% of its original size.

Note: If an image is inserted in Word and is then resized, when the .Zip trick is performed the extracted image file will be at 100% of its original size.

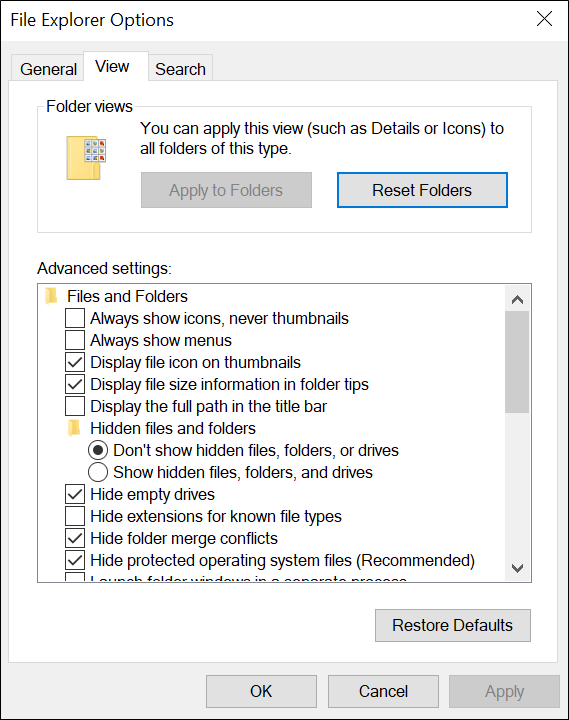
For this to work file extensions cannot be hidden in Windows Explorer. To make file extensions show:

  1. Click Start menu, then Control Panel.
  2. Click Appearances and Personalization.
  3. Click File Explorer Options.
  4. Click View tab.
  5. Uncheck the Hide extensions for known file types.

      Changing the Word file to Zip.

  1. Create a copy of the file because the Word file cannot be retrieved from the .ZIP.
  2. Caution: Once this process is complete, the Word file will no longer appear in Windows Explorer. If you have not made a copy of the Word file and converted the copy to a zip, the original file cannot be retrieved.
  3. Open the doc in Word and Save As .docx. Note: This Zip Trick will not work if the file extension is .doc.
  4. In Windows explorer, change the file extension to .zip.
  5. A prompt will appear to verify you want to change the file name extension. Click Yes.
  6. Double-click on the .zip file to open it.
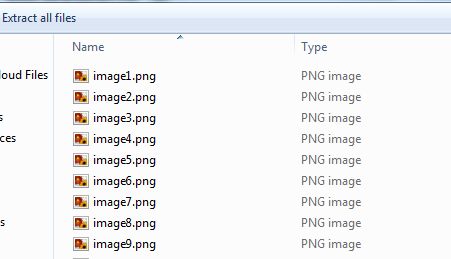
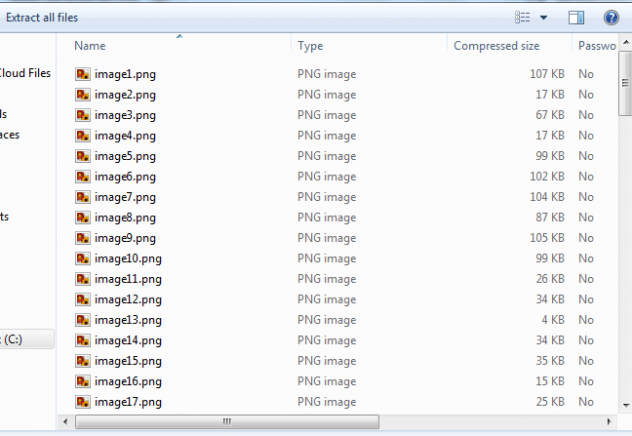
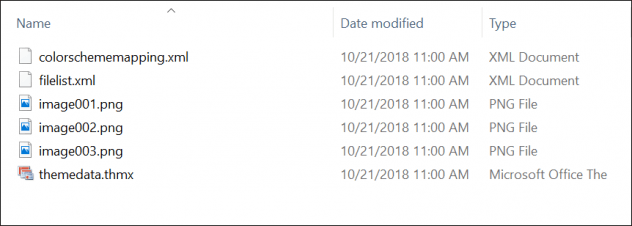
  7. Navigate to the Word/Media folder. Each image from the document will appear as a .PNG file. Image#.PNG – they will be ordered starting at 1 in the order they appear in the document.

Saving Document as a Web Page

  1. Open the document in Word.
  2. Click File, then Save As.
  3. In the Save As Type list, select Web Page (*.htm,*html). Do Not select Web Page Filtered, this will result in lower resolution images.
  4. Click Save.
  5. Navigate to the save location and Open the Extracted Images_files folder. Each image from the document will appear as a .PNG file. Image#.PNG – they will be ordered starting at 1 in the order they appear in the document.

Importing Document to Help Authoring Tool

My standard Help authoring tool is Flare. These steps reflect that tool. It is possible to complete the same process with RoboHelp, with slightly different steps. While images can be extracted with this tool, it is the most complicated because it is necessary to have some familiarity with Flare. The Advantage in this method is that images will be named with the section/chapter they appear along with a number, rather than just Image#.png. This can make it easy to keep the images organized when there are many images and to possibly split the image work across multiple writers for edits.

  1. Open Flare and click the Project menu.
  2. Click Import, then MS Word Documents. The import wizard will open.
  3. Follow the wizard screens to create a project, select the Word document, new topic styles, options, stylesheet, paragraph and character mapping, then click Finish. The new topic styles setting determines the name of the files once extracted. For instance, if Heading 1 is selected to break to a new topic, the image names will be the name of the heading followed by a number, the order starting at 1 that the images appear in that heading section.
  4. Click Accept on the Accept Imported Documents popup.
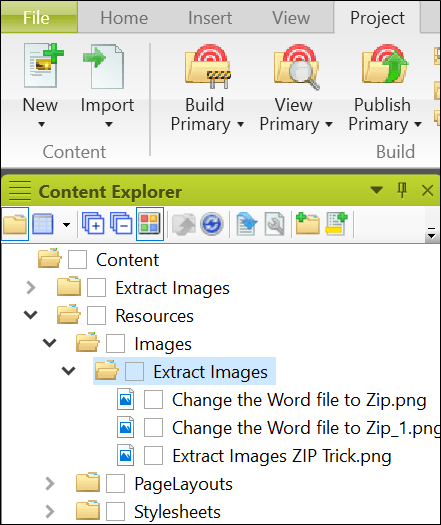
  5. Navigate to the Content/Resources/Images/[Document Name]. The images appear in a folder with the same name as the document. Remember, if a new topic style was chosen in the import wizard the images will have the name of the heading section they appear. Otherwise all images are given the name of the original document followed by a number.

How to Network with LinkedIn

In April 2017, LinkedIn reached 500 million members, which means it’s a powerful professional networking website. Still, a lot of people on LinkedIn aren’t using it to it’s fullest potential. Are you?

  1. Make sure your profile is complete. Yes, it takes some time to completely set up your profile, but it’s important to put in the time and effort in order to show what you have to offer a potential employer. This also means including many different experiences and not just your education and experience. There are multiple categories you can add to on LinkedIn like volunteering, organizations, awards and honors, etc. There is even a space you can include information about current projects. Be sure to include all this information.
  2. Connect with people you already know. You don’t have to add a bunch of people you don’t know on LinkedIn or start adding potential connections right away. Start with people you know–friends, family, current and former coworkers, former classmates from college or even high school. There is a large list of people out there to begin with, and you’ll probably find that you know more people you thought. If you find someone you know from meeting that one time five years ago, connect with that person. Just customize the message you send to them and remind them who you are and where you’ve met. They might remember you, too.
  3. Connect with people you don’t know. When adding people, check out their profile and then craft a short personal message. That extra personal touch will catch people’s eyes.
  4. Join groups. There are a number of LinkedIn pages for businesses or organizations. Begin joining the networks of the ones you know. Start with your college alumni group and go from there. Think about past experiences, groups you’d already voluteered for, and organizations you’d like to get to know more about. Once you’ve joined groups, be active in them. Post comments on their organization’s posts and other threads.
  5. Stay active and update.  Like any social media account, it’s important to stay active. That means posting links to new posts on your blog, to new publications, or to interesting articles you read. No matter what be sure what you’re posting is going to benefit your image in some way. Don’t post links that will be detrimental to your professional image.
  6. Support your friends, and they’ll support you. In other words, make your friends look good, and maybe they’ll help you out too. Endorse your connections’ skills and comment on their posts. If you’re engaging with them, they’re more likely to engage with you. Those small engagements drive their friends to your page which means your profile reaches more people. Beyond that, write meaningful recommendations for your friends. They more a lot more than endorsements to potential viewers/employers.
  7. Don’t spam people. This one is obvious. Don’t over post on Linkedin or overly message potential connections. Use the site professionally and appropriately.
  8. Put time into it. Networking takes a lot of time in person, which means it should still take a lot of time online. It’s important to put some time and effort into building your own professional connections.

Writing for Global Audiences

With the rise of the Internet, the world is smaller than ever before. Whether you’re designing websites for a global marketplace or managing translation of user manuals, you need to make sure your content can reach a global audience.

Don’t worry; you won’t have to dust off your high school French. Translation is part of a broader process called localization. Localization adapts a document for a different target market. This goes beyond translation to include changing number and date/time formats, currencies, symbols, graphics and more.

Although localization is a task best left to specialists, writers can make this process easier by keeping global audiences in mind when they’re writing. This is called internationalization – i18n for short.

Tips for Internationalizing Text

Following some standard guidance can help make your document easier to localize.

  • Avoid Idioms and Metaphors – Because idioms are not taken literally, it can be difficult to translate them into other languages. Sports metaphors and cultural references are also problematic. “We’re batting a thousand” will be readily understood in America. In Russia? Not so much.


  • Avoid Synonyms – Synonyms can confuse readers whose vocabularies are limited. They can also cause translators to wonder if you’re referring to the same thing in both cases.
  • Beware of Embarrassing Words – You can’t know all of the words that might have embarrassing meanings in other languages, but avoid those you do know.
  • Write Out Dates – 01/05/15: Is that January 5th or May 1st? It depends on where you are. You can avoid ambiguity by always writing out month names.
  • Avoid Holiday-Specific References – References to holidays are culture- specific, and often include religious overtones. Saying that someone was “as excited as a child on Christmas morning” will mean little in a culture where they know as much about Christmas as you do about Diwali.
  • Avoid Discriminatory Language – Use multicultural names and examples, and avoid stereotypes.
  • Be Clear and Concise – If something is hard to understand in English, it’s going to be harder to translate. Complex syntax can confuse non-native speakers.
  • Leave Space – Translated text will take up more or less space than its English counterpart. Web pages and software applications are particularly vulnerable to layout issues when the text is suddenly too big to fit in the size allotted.Tips for Internationalizing Images

    When your document contains images, internationalization takes on a whole new dimension. Following these tips can save you lots of headaches when you need to localize your images.

  • Avoid Words – An image that contains text can be a nightmare to localize. You can keep text and images separate using captions or HTML overlays. Even better: use images that need no description.
  • Avoid Offensive Symbols – Even common symbols can be offensive in some cultures. Facebook famously changed its “Like” button from a thumb to a stylized “f” because the thumbs-up sign has different meanings in different parts of the world.

  • Use Layers – Most image software allows you to separate text from the underlying image using layers. Provide the original files to your localization team so they can easily change the text.
  • Leave Space – Words often expand in length when translated, which can mess up your carefully composed diagram. Make sure your image has enough room to accommodate longer translations.
  • Save the Data – If your document contains charts or graphs, be sure to save the original data or spreadsheet. That way you can simply re-generate the chart with the translated text instead of having to perform costly and complex image editing.Bottom LineNow, more than ever, professional writers need to be aware of their global audiences. By taking the time to consider internationalization up front, writers can save their organizations (and themselves!) a great deal of time, money and effort in the localization process. You can be the one to help your company go global.Further ReadingThe Top 10 Ways to Cut Website Translation Costs

    Think Globally, Write Locally

    Guidelines on the Use of Non-Discriminatory Language

    Text Size in TranslationW3C Internationalization

    Common Idioms and Metaphors

Creating a Writing Portfolio 101

Picture this scenario: Editor X receives two nearly identical pitches—one from Writer A and one from Writer B. Writer A uses snappier language and a more appealing tone but doesn’t reference any previous publications. Writer B, meanwhile, concludes her pitch with a link to an online portfolio of her work. With one click of the mouse, Editor X can read through her best stories and find out where they were published. She likes what she sees. To whom does she respond? Writer B, of course.

Your ability to represent yourself online—and be readily found—is a crucial part of establishing yourself as a writer and building your credibility. As you seek work, you need a portfolio that is digital in format, easy to navigate, and professional. In most cases, it is your published clips or commissioned projects that should come to the fore, rather than you as the writer—though a headshot of yourself (not a selfie), an About section, and a link to your resume or LinkedIn profile can all be appropriate.

Steps to building a successful portfolio:

  1. Know your niche. The first thing you want to consider when building a portfolio is how to tailor it to your particular industry. If you want to pursue a career in copywriting for an ad agency, your portfolio will look different from one intended for the nonprofit sector.Check out the websites and online portfolios of a few writers you admire in your industry to see how they represent themselves before building your own. If you have multiple specialties as a writer, you may want to build separate pages or even separate sites for each topic area or genre.
  2. Choose your work wisely. Don’t pile everything you’ve ever written into your portfolio. Instead, be selective. Put forward only work you want an editor’s attention drawn to. This may mean you begin with only 3-5 pieces in your portfolio, which is fine.If there is a new category of work you want to pursue, consider creating sample content to represent how you would handle an assignment. Want to break into PR? Draft a press release for a new business in your neighborhood. As long as the sample is highly professionaland you make clear that it is not a commissioned or published workthen it’s fair game to include.
  3. Select a professional platform. There are endless options available for creating a portfolio that is highly professional in appearance and affordableor even free! Some of the most respected sites include Contently, Squarespace, Clippings.me, Pressfolios, and Issuu. Take a look at their sample sites and portfolios to get an idea of the aesthetic and organizational possibilities before you begin. Remember to keep your design simple and uncluttered. If you can, customize the domain name to your own name or your business name.
  4. Get feedback. Once you’ve built your portfolio, consider sending it to a couple trusted colleagues, classmates, or mentors for their review. Ask them what sort of impression your portfolio conveys. Once you’ve made any needed adjustments, you can begin linking to your portfolio each time you correspond with an editor or client. You can even consider including it in your email signature or adding it to your LinkedIn profile.
  5. Keep it fresh. Finally, as you acquire more writing samples and published clips, update your portfolio. Don’t neglect to keep your portfolio updated with new content and weed out the old. Your online portfolio should evolve as the trajectory of your professional writing evolves, and it should keep helping you win new business.

Your Business Wants to Be Social Too!

Apparently this is not a fad.

Social media continues to grow exponentially. The beginning of 2015 found that slightly over 40 percent of the world’s population is online and close to 30 percent have active social media accounts. We use this medium to keep in touch, share ideas, and persuade governments. The solutions that can be achieved appear limitless. So, with such a powerful tool at your fingertips, how are you using social media to grow your business?

My name is Mike and I have been in the marketing communications profession for 25 years, per-dating this electronic medium that has infiltrated every aspect of our lives. As a student at Chatham University in the Master of Professional Writing program, I explored this question as part of a bi-weekly, ten part blog series.

Together, let us explore a few of the more popular social sites and identify the pros and cons of each. I offer examples and best practices for presenting a strong profile for your business on that week’s platform. To wrap up the series, we look at the practice of blogging and how these four pieces combine to build a strong, cohesive marketing campaign for any size business.

It’s time to integrate your social media marketing and build your brand. Posting a profile and depending on a breeze to deliver it to your audience is hit-or-miss at best. Planning and execution hits each mark and securely plants the seed to grow a thriving business.

Begin your social media marketing journey with me now.

Social Media in the Breeze